
Sending files & images
Sometimes the fastest way to explain something is to show it: a screenshot of a broken layout, the PDF spec you’re working from, a CSV to summarise, a log file to trace. Since v0.38 you can attach files and images to a message right in the composer, and Claude reads them directly — native vision on images and PDFs, plain-text reads on everything else.
This guide covers the day-to-day: the three ways to attach a file, the tray that holds them before you send, what Claude actually does with them, and the limits you can tune. It’s the practical companion to Working in chats.
Three ways to attach
Section titled “Three ways to attach”Every chat’s composer has a paperclip button, shown whenever the instance has attachments enabled. There are three ways to add files, and they all feed the same tray:
- Pick. Click the paperclip button (“Attach files”) to open your OS file chooser. You can select more than one file at once.
- Drag & drop. Drag files from your desktop onto the composer — a “Drop files to attach” overlay highlights the drop zone — and release.
- Paste. Copy an image or file and press ⌘V / Ctrl+V with the composer focused. This is the quick path for a screenshot: grab a region, paste, send.
Each file uploads immediately (an Uploading… hint shows while it’s in flight), then lands in the attachment tray just above the composer.
The attachment tray
Section titled “The attachment tray”Staged files appear as a row of removable items above the message box: images show as thumbnails, and every other kind shows as a compact chip (icon · filename · size). Hover an item and click the ✕ to drop it before sending.
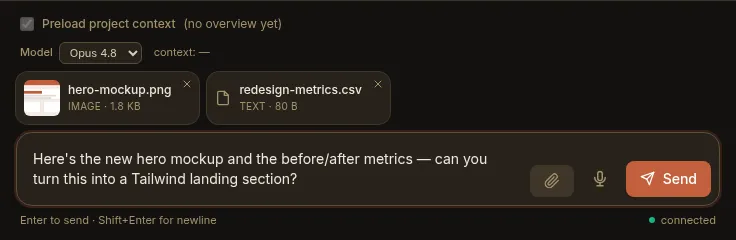
Attachments ride along with your next message. Type your prompt and press Enter — the files send with it and the tray clears. You can also send with no text at all as long as at least one file is attached (handy for “here’s the screenshot, take a look”). Everything you’ve read about the composer and the message queue still applies; attachments simply travel with the turn.
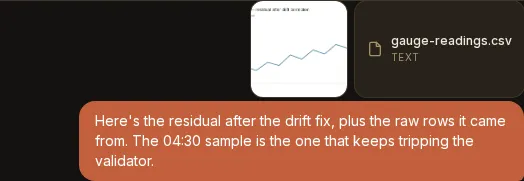
Once sent, they stay part of the transcript and render the same way on a reload — images as thumbnails you can click to open full size, other files as chips naming the type:
What Claude does with them
Section titled “What Claude does with them”When your message sends, Paddock copies each file into its attachment store and
points Claude’s Read tool at the stored copies. What it sees depends on the
file:
- Images (
.png,.jpg,.gif,.webp, …) — read with native vision. Claude genuinely sees the picture: a UI screenshot, a diagram, a photo. - PDFs — read natively too; Claude reads the rendered document, not just extracted text.
- Text, code, Markdown, CSV, and the like — read as text through the same
Readtool.
This works on any runtime — it’s Claude Code’s own Read tool doing the reading,
so no special model or configuration is needed.
Sent files stay with the chat. They render inline in the transcript (thumbnails for images, chips for other files) and re-render on reload from the store, so a shared file looks the same forever — it’s an immutable snapshot, not a live link to a path on the box. Deleting the chat removes its uploaded files too.
Limits & allowed types
Section titled “Limits & allowed types”A few guardrails keep uploads sane. The defaults are:
| Limit | Default | Meaning |
|---|---|---|
| Max file size | 25 MB | Per file. A larger file is rejected. |
| Files per message | 10 | Across a single message’s tray. |
| Allowed types | all | No type restriction out of the box. |
These are server-enforced — the composer mirrors them for a fast, friendly rejection (a too-big or disallowed file never uploads), but the server is the authority. If your instance restricts types, the file picker’s accept hint and the composer’s checks follow the same allow-list.
You can tune all of these per instance or per project:
- Instance-wide, via the
PADDOCK_ATTACHMENTS_*environment variables or the matchingattachmentsblock in the config file — see the environment reference. - Per project, via an
attachmentsoverride in that project’sproject.yaml(each field inherits the instance default when unset), including turning uploads off entirely for a project (enabled: false) — which hides the paperclip and refuses the upload endpoint.
Next steps
Section titled “Next steps”- Working in chats — the composer, the queue, Stop, and keeping the chat list legible.
- Environment variables
— the
PADDOCK_ATTACHMENTS_*knobs. - Config file (YAML) — set the same knobs in one file, and override them per project.